Downgrading with PSgrade Dongle
Note: superseded by FactoryServiceMode Tool v0.2 - JIGless Factory/Service Mode :)

Notes from the author[edit | edit source]
- When this guide was written, no 3.55 factory consoles existed, use extreme caution when trying on modern consoles with versionchecks in metldr.
- This guide has been superceded by QA downgrading which do not have the problem of BluRay Movie playback loss on NAND consoles.
- Although archaic/catched by progress, this guide should have been earlier on wiki imo for historic completness.
- This guide was written with Eclips3 dongle as target but ANY PSgrade capable device can be used.
- PSGrade compiled for various USB development boards : psgrade-hex.rar (136.07 KB) [1] [2]
- includes hex files for:
- at90usbkey at90usb1287 8mhz
- atavrusbrf01 at90usb162 16mhz
- avrkey atmega32u2 16mhz
- bentio at90usb162 16mhz
- blackcat at90usb162 16mhz
- jmdbu2 atmega32u4 8mhz
- maximus at90usb162 16mhz
- minimus at90usb162 16mhz
- minimus atmega32u2 16mhz
- nanousbdev at90usb162mhz
- olimex at90usb162 8mhz
- ps2chiper at90usb162 8mhz
- ps3yes at90usb162 16mhz
- ps3yespro at90usb162 8mhz
- teensy++1.0 at90usb646 16mhz
- teensy++2.0 at90usb1286 16mhz
- teensy1.0 at90usb162 16mhz
- teensy2.0 atmega32u4 16mhz
- udip at90usb162 16mhz
- udip at90usb162 8mhz
- usbkey at90usb1287 8mhz
- usbkey atmega16u4 8mhz
- usbtinymkii at90usb162 16mhz
- xplain at90usb1287 8mhz
- includes hex files for:
- There is a large list of alternative Jailbreak/PSgrade devices listed on the talkpage
- PSGrade/JIG for E3 Card Reader: https://www.mirrorcreator.com/files/268JJNVY/E3cardreader_-_PSgrade-JIG.7z_links
- PSGrade compiled for various USB development boards : psgrade-hex.rar (136.07 KB) [1] [2]
converted guide in wiki formatting:

Download the required files[edit | edit source]
http://www.psdevwiki.com/files/PSGrade/Eclips3/
https://archive.org/download/eclips-3-1.5/Eclips3-1.3.rar
https://archive.org/download/eclips-3-1.5/Eclips3-1.5.rar
https://www.mirrorcreator.com/files/D5OIZZWX/Eclips3-1.4c.rar_links
Updated to V1.4c with DowngraderV1.1. Dec 10, 2010
Eclipse Downgrader Pack V1.4c.zip (167.65 MB) contains:

3.55 addon[edit | edit source]
Lv2Diag.self (File 2) to get out of service mode in 3.55
Generic 3.55 LV2diag.self package
Eclipse Updater v1.5[edit | edit source]
Eclips3-1.5FWUpdater.rar (1.71 MB)
Using the Eclipse Updater / Downgrader[edit | edit source]

Flashing your Eclips3 dongle is extremely simple. Just connect the dongle to an USB port of your PC and execute the EclipseDowngrader.exe
The Eclipse Updater / Downgrader application has 5 functions:
- Normal update:
For a normal jailbreaking update of FW 3.41, select "ECLIPSE FIRMWARE V1.4" and press the START button in the application. - JIG / Downgrader Dongle:
To use the Eclipse dongle as a JIG (for FW 3.50 and below) for downgrading your PS3 System Software (FW), just select "DOWNGRADER V1.1" and press the START button in the application. - any HEX:
If you want to use HEX's compiled by your own (for any JailBreakable FW), select "IMPORT PSGROOVE/PSFREEDOM FIRMWARE" and press the START button in the application. - any PAYLOAD.BIN:
If you want to import PAYLOAD.BIN's, select "IMPORT PAYLOAD" and press the START button in the application. - Erase:
If you want to erase the Eclipse Dongle, with only the default bootloader present, select "ERASE ONLY" and press the START button in the application.
NB: If your computer is not up to date, you'll have to download the latest Microsoft Updated Libraries, necessary on some OS to avoid the "MSVCR100.dll" error: vcredist_x86.exe.
Prepare the Eclipse as an JIG / downgrader dongle[edit | edit source]

Connect the dongle to an USB port of your PC, execute the EclipseDowngrader.exe, select "DOWNGRADER V1.1" and press the START button in the application to flash the Eclipse for use as a JIG / downgrader dongle (option 2 from the previous explaination). Close the EclipseDowngrader.exe application and safely remove the Eclips3 dongle.
Downgrading Process[edit | edit source]
The downgrading method for Eclips3 is almost identical to any other PSgrade/JIG device.
I recommend you backup your saved games and /dev_flash folders — not in all cases the downgrade can be performed without dataloss. There are conflicting reports of this, for some it works lossless (e.g. old PS3 FAT users with 256MB NAND), for others the harddisk is completely blanked (newer PS3 and PS3 slim users with 16MB NOR). You can use the XMB built-in BACKUP/RESTORE functions (fast, but doesn't backup locked/system files), and if you are running a JailBreak capable firmware, you can use FTP (slow). For the /dev_flash folders you need to use either FTP or Multiman / Comgenie Filemanager.
You can use the downgrading process also to convert a kiosk/demo model to a full retail model: *guide*
Warning notes:
- Do not UPdate in Factory/Service Mode (results in "8002f14e" error), only downgrade or same version! Only UPgrade in Retail mode!
- Do not use Factory/Service Mode to enforce installing Debug updates on Retail PS3's! (*fix*)
- Do not downgrade if you use the PS3 for playing Blu-Ray movies! (fix: you need to restore the backup after downgrade you have made of /dev_flash2 and /dev_flash3 before downgrading). Models affected: all 256MB NAND models (CECHA up and including CECHG, log after downgrade contains 'vflash disabled'). 16MB NOR models are unaffected (CECHH and higher/newer are unaffected, log after downgrade contains 'vflash enabled') and can still play bluray movies after downgrade.
Getting in Factory/Service Mode and Downgrading[edit | edit source]
- Insert the Eclips3 dongle that has been flashed with the JIG / downgrader into the rightmost USB-port (closest to the Blu-Ray reader) of your PS3. Turn on the console using the same boot method as all other jailbreaks: Press power then immediately press eject within ~200ms. Your console will turn on and the Eclips3 dongle will light up the red LED followed by the green LED. Turn off your PS3 via menu.
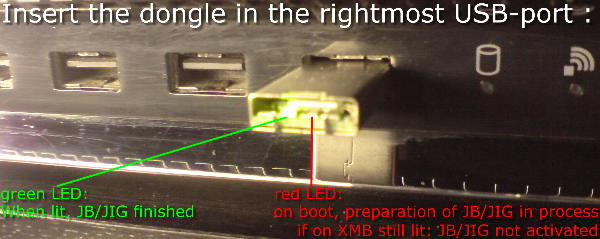
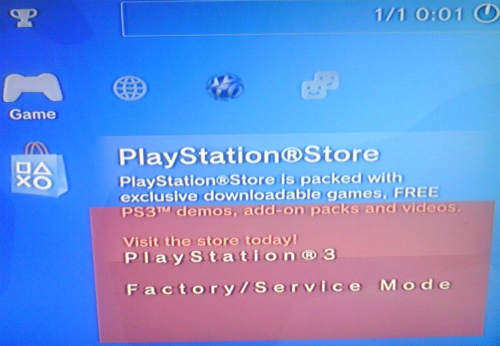
- Remove Eclips3 dongle and turn on console to check you are in Factory/Service Mode. You'll see a huge red box on the screen saying Factory/Service Mode. Turn the PS3 off again.
Remarks:- If you are using a component cable the image might be garbled.
- If you are using HDMI, you don't have any screenoutput at all after the "press PS-button" message. (note: conflicting reports on HDMI working or not in FSM)
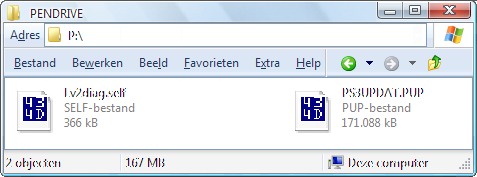
- Load any FAT32 USB Mass Storage Device with 2 files in the root directory:
- the file "PS3UPDAT.PUP" from the Modified 3.41 PUP subfolder
- the file "Lv2diag.self" from the Lv2diag.self FILE 1 subfolder
These must be the only files on the USB pendrive and must be placed in the main (root) directory.
Problem solving / tips:[edit | edit source]
- Don't use any USB Mass Storage Device with enhanced functions as: encryption, fingerprintreader, U3, pincode etc.
- Don't use USB Mass Storage Devices with a long initialisation time (e.g. some MP3 players)
- Don't use multipartitioned USB Mass Storage Devices, only use 1 single primary FAT32 partition.
- Make sure they are formatted according to specifications with FAT32 (e.g. HP USB Format Tool - or TOKIWA / Ridgecrop FAT32 formatter)
- Most USB Mass Storage Devices that'll work effortless with PenDrive Linux, will also work with the PS3 (for downgrading, upgrading, storage of your Game dumps and any normal filestorage under the XMB). Those USB Mass Storage Devices are most likely also the ones giving you the least problems under more exotic platforms like PSX/PSone, PS2/PStwo, Xbox/X360, Gamecube/Wii etc.
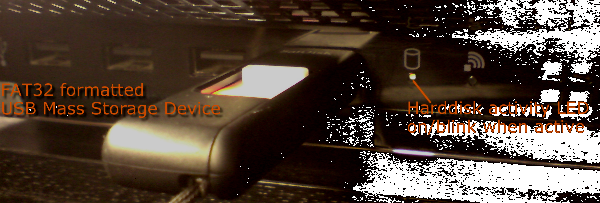
- Insert the USB Mass Storage Device into the rightmost USB-port (closest to the Blu-Ray reader) of your PS3 (same port we used earlier). Turn the PS3 on and you'll see a black screen but if you look closely the PS3 Hardisk Actity LED will flash. The process takes about 3-4 minutes for the system to install the firmware. Towards the end, the power button on the console will start flashing green and then the console will power off.
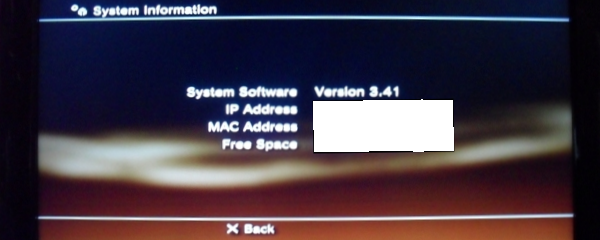
- Remove the USB Mass Storage Device and turn on the console, you'll still be in Factory/Service Mode. Verify you've downgraded successfully by going to "System Information". Turn the PS3 off.
- (Optional) – If you wish to downgrade to any older/other firmware you can follow steps 3, 4, 5 using any regular full official firmware PUP. You do not need to use a modified custom firmware anymore now that you're on modified 3.41. Always use a full firmware PUP — using smaller incremental firmware PUPs is not recommended, if at all possible.
Safe Downgrading Table[edit | edit source]
You can use the SKU Models table as a reference for safedowngrading (by not lowering the FW below the FW that was available at releasedate/it came equiped with) or use the MinVerChk PUP in Retail mode.


Getting out of factory/service mode and back into Retail Mode[edit | edit source]
Insert the USB Mass Storage Device back into your PC and delete all previous used .PUP and .SELF files and copy the other Lv2Diag.self (File 2) to the root of the flash drive. Insert the USB Mass Storage Device into the rightmost USB-port (closest to the Blu-Ray reader) of your PS3 (same port we used earlier). Power on the PS3 and after about 10 seconds it will power off.

Out of factory/service mode and setting things right in Retail mode[edit | edit source]
Remove USB flash drive and turn on your console again. You'll be out of Factory/Service mode and back in retail mode with your chosen firmware version installed. You'll need to go through and configure everything again — PS3 video, audio, date/time etc…
Remove JIG/Downgrader firmware and restore Jailbreaking firmware on Eclips3 dongle[edit | edit source]
Once you’re done downgrading you can restore the Eclips3 jailbreaking firmware (use the previous "Using the Eclipse Updater / Downgrader" guide for help). First flash back the "ECLIPSE FIRMWARE V1.4" and after that you can use any valid psgroove HEX with "IMPORT PSGROOVE/PSFREEDOM FIRMWARE" and flash it again.

Problem solving / tip:
- If you have trouble getting the Jailbreaking firmware back on the Eclips3, use the EclipseUpdaterV1.3 application.
- If you still have troubles, you can try erasing first.
| ||||||||||||||||||||||||||||||||||||||