Power Supply
Power Supply Unit (PSU)[edit | edit source]
Most PS3 models have a universal (multi-voltage) built-in power supply (some PS3 FAT models have LSEB1226B1, LSEB1254A1 or APS-227 power supplies that are rated as 220-240V input only and cannot operate correctly with voltages under 220V). This means that even though a specific voltage is written on the outside of the PS3 if it has a universal PSU it can actually be plugged in anywhere in the world and work (as long as you have the correct power cable), if you open up a PS3 the supported voltages should be listed on the power supply as 100V-240V which is the range for all power outlets in the world if it has a universal PSU.
PSU Model @ SKU compatibility[edit | edit source]
Retail models[edit | edit source]
- As seen in the table below, the PS3 takes 100V-240V AC (with exception of APS-227, LSEB1226B1 and LSEB1254A1) at various amps (A) from your power socket, and converts this to two DC (Direct Current) voltages of 12V, and 5V (or 5.5V for later PS3 models) at various amps.
- Watts = Volts * Amps (you are billed for total watts used over time by your local power provider)
| Power Supply Unit | Power Supply Internal Board | Power | Rating | PS3 model Compatibility | |||||||||
|---|---|---|---|---|---|---|---|---|---|---|---|---|---|
| Model | Part Number | Weight | Model | Part Number | Control Conn. | 12V Rail Conn. | Input (AC) | Output (DC) | Cumulative | Efficiency | Found in | Compatible with | |
| ZSSR539IA | 1-474-036-11 | 815gr | (1)acdc_stby (2)gnd (3)gnd (4)5vsb (5)5vsb |
2x cylindrical plugs Length=18 mm Diameter=3.5 mm Pitch=12mm |
100V-240V 6.0A 50/60Hz | 5V 3A (15W) |
12V 32A (384W) |
399W | 66.5% | A, B, E | A, B, C, E | ||
| APS-226 | 1-474-037-11 | 770gr | APS-226 M | 100V-240V 4.8-2.0A 50/60Hz | 83.13% | A, B, E | A, B, C, E | ||||||
| APS-227 | 1-474-046-11 | 900gr | APS-227 M | 1-872-990-11 | 220V-240V 2.2A 50/60Hz | 75.6-82.4% | C | C | |||||
| LSEB1226A1 | 1-474-059-11 | LSJB1226-1 | 100V-240V 4.8-2.2A 50/60Hz | 12V 31A (372W) |
387W | 70.5-80.6% | C | C, E | |||||
| APS-231 | 1-474-073-11 | 700gr | APS-231 M | 1-874-541-12 | 100V-240V 3.5-1.5A 50/60Hz | 5V 0.6A (3W) |
12V 23.5A (282W) |
285W | 79.2-81.4% | G | A, B, E, G | ||
| LSEB1226B1 | 1-474-074-11 | 700gr | 220V-240V 1.7-1.6A 50/60Hz | 74.2-76.2% | G | A, B, E, G | |||||||
| LSEB1254A1 | 1-474-081-11 | 700gr | 220V-240V 1.7-1.6A 50/60Hz | 74.2-76.2% | G | A, B, E, G | |||||||
| EADP-300AB | 1-474-084-11 | (1)acdc_stby (2)gnd (3)5vsb |
2x plane plugs Length=22 mm Width=4.5 mm Thickness=1.25 mm Pitch=9 mm |
100V-240V 3.6-1.5A 50/60Hz | 77.7-79.2% | H, Q | H, Q | ||||||
| APS-239 | 1-474-087-11 | APS-239 M | 1-875-950-11 | 100V-240V 3.5-1.5A 50/60Hz | 79.2-81.4% | H, K | H, K | ||||||
| EADP-260AB | 1-474-104-11 | EADP-260AP A | 2941040002 | 100V-240V 3.3-1.4A 50/60Hz | 12V 21.5A (258W) |
261W | 79.09% | J, K | H, K | ||||
| APS-240 | 1-474-126-11 | APS-240 | 1-887-678-22 | (1)5vsb (2)gnd (3)acdc_stby (4)acin_det |
100V-240V 3.3-1.4A 50/60Hz | 5.5V 0.9A (4.95W) |
12V 21A (252W) |
256.95W | 76.5-77.9% | L, M, P | L, M, P | ||
| EADP-260BB | 1-474-129-11 | 600gr | EADP-260BP A | 2941042404 | 100V-240V 3.3-1.4A 50/60Hz | 76.5-77.9% | |||||||
| EADP-220BB | 1-474-175-11 | 442gr | EADP-220BP A | 2941047904 | 2x plane plugs Length=20 mm Width=3.5 mm Thickness=1 mm Pitch=8 mm |
100V-240V 3.2-1.2A 50/60Hz | 12V 18A (216W) |
220.95W | 69-76.7% | 20 | 20, 21, 25 | ||
| APS-250 | 1-474-177-xx | APS-250 MB | 1-879-919-xx | 100V-240V 2.7-1.2A 50/60Hz | 76.7-81.8% | ||||||||
| APS-270 | 1-474-216-11 | 384gr | APS-270 MB | 1-881-752-xx | 100V-240V 2.5-1.1A 50/60Hz | 12V 16A (192W) |
196.95W | 74.6-78.8% | 21, 25 | 21, 25 (not 20) | |||
| EADP-200DB | 1-474-217-xx | 415gr | EADP-200DP A | 2941053505 | 100V-240V 2.6-1.0A 50/60Hz | 75.8-82.1% | |||||||
| APS-306 | 1-474-339-11 | APS-306 MB | 1-884-580-21 | 2x plane plugs Length=22 mm Width=2 mm Thickness=0.6 mm Pitch=6.75 mm |
100V-240V 2.0-0.9A 50/60Hz | 12V 13A (156W) |
160.95W | 74.5-80.5% | 30 | 30 | |||
| EADP-185AB | 1-474-340-11 | 382gr | EADP-185AP A | 100V-240V 2.1-0.8A 50/60Hz | 76.6-83.8% | 30 | 30 | ||||||
| ADP-160AR | 1-474-400-11 | ADP-160AR AA | 2x plane plugs Length=18 mm Width=1.6 mm Thickness=0.6 mm Pitch=7 mm |
100V-240V 2.1-0.8A 50/60Hz | 76.6-83.8% | 40, 42, 43 | 40, 42, 43 | ||||||
| APS-330 | 1-490-468-11 | APS-330 MB | 1-866-716-11 | 100V-240V 2.0-0.9A 50/60Hz | 74.5-80.5% | 40, 42, 43 | 40, 42, 43 | ||||||
| APS-330/B | 1-490-468-21 | APS-330/B MB | 1-888-480-21 | 100V-240V 2.0-0.9A 50/60Hz | 43 | 40, 42, 43 | |||||||
| N12-160P1A | 1-474-548-11 | 100V-240V 2.0-0.9A 50/60Hz | 74.5-80.5% | ? | 40, 42, 43 | ||||||||
NonRetail models[edit | edit source]
| Power Supply Unit | Power Supply Internal Board | Power | Rating | PS3 model Compatibility | ||||||||||
|---|---|---|---|---|---|---|---|---|---|---|---|---|---|---|
| Model | Part Number | Weight | Model | Part Number | Connectors | Input (AC) | Output (DC) | Cumulative | Efficiency | Found in | Compatible with | |||
| ZSSR541iB | 1-474-032-21 | 24p, 22p, | 100V-240V 9.5-4A 50/60Hz | 5V(Sub) 1.6A (8W) |
3.3V 23A (75.9W) |
5V 8.2A (41W) |
12V 31.2A (374.4W) |
499.3W | 52.56% | DECR-1000A, DECR-1000J | DECR-1000A, DECR-1000J | |||
| DECR-1010A, DECR-1010J | DECR-1010A, DECR-1010J | |||||||||||||
| APS-231 | 1-474-073-11 | 700gr | APS-231 M | 1-874-541-12 | 2p, 5p | 100V-240V 3.5-1.5A 50/60Hz | 12V 23.5A (282W) |
5V 0.6A (3W) |
285W | 79.2-81.4% | DECR-1400A, DECR-1400J | DECR-1400A, DECR-1400J | ||
Modifications and Repairs[edit | edit source]
Replacing the PSU[edit | edit source]
The earliest batch of PS3 had the ZSSR5391A power supply, which as you can see in the above table draws a lot of amps from your power outlet. You can replace it with newer compatible power supply models that draw less power and produce less heat. Less heat means less bending of the motherboard, less cracking of the solder, less fan noise, lower electricity bills, and no "Yellow Light of Death." In fact, for most models of the PS3, you can find a better power supply to replace the original. One of the main compatibility criteria is the number of pins on the power supply. It must match the number of pins on your connector cable. The second is to try to find the highest efficiency model that still satisfies the proper output power that your PS3 is rated for.
As a general rule, all power supplies (not just the ones in PS3s) are most efficient at approximately 50% load, this is why almost all PSU models in the chart are rated for roughly twice what the PS3 draws under full load. EG. A CECHA/B draws approximately 200-220W when under full load using an APS-226, this power draw number is slightly higher when using the original ZSSR PSU which also runs notably warmer because it is less efficient and converts more of the energy into waste heat.
WARNING: if you decide to replace your power supply, you do it at your own risk! If you don't know what you are doing, you may fry your motherboard.
- note: more discussion on the talk page. Talk:Power Supply
Externalising the PSU[edit | edit source]
This is useful for tests, repairs, flashing, etc... (as a power source tool used temporally), or permanently to reduce heat inside the PS3's case to avoid overheating
For a permanent install is highly suggested to purchase connectors that will fit the PSU and motherboard to create a proper power cable adaptor. Remember that inside the console the fan also gives the PSU some airflow, so it is highly recommended to add a fan to your external PSU to make sure the PSU doesn't get too hot (it does not have to spin very fast just enough to keep the internal temperatures constant and low enough to not cause damage).
The correct thickness of the wires needed for the 12v plugs depends on the number of amperes (A) the PSU provides on the 12v rail, if you want to "play it safe" a good idea is to exceed this requirement by a lot (considering the full amperes of the 12v rail will travel along these wires, this is not the same case with a PC where the total amperes assigned to the 12v rail are divided in a lot of yellow wires so they are thinner than we need for a PS3). As an example, the oldest PS3 PSU's with 32A can use AWG10 wires, and newer PSU's with 13A can use AWG16 wires, for other intermediate models you can take a look here: http://en.wikipedia.org/wiki/American_wire_gauge#Tables_of_AWG_wire_sizes (the value of the "ampacity" column)
Please remember the obvious: Check with a multimeter to find which is positive and which is negative! (use a tester in continuity, and measure which plug is connected to the border of the PSU board, the border is always ground), after identifying it you can use a permanent black pen to mark it to avoid forgiving it
Also, ensure the connections are solid and have no dry joints when soldering. All of this also applies when extending the white power cable from the PSU to the motherboard.
If you get the positive/negative the wrong way around the red standby light will light up but the console will not power on
- Twisted wires (the ghetto style, no connectors)
This is very simple, get a thick cable like a 110v/220v power cable and strip off the shielding. This exposes the positive and negative wires, from here simply strip off the shielding of the two and twist the ends. Appropriately plug the correct positive & negative into the PSU (PSU's always have female connectors, cylindrical in FAT models and plain in slim and super slim models, this is basically a hole you can plug anything into, even a cable without a connector) and wrap the other positive & negative end on the poles of the PS3's motherboard

Testing the voltage of a PSU with twisted cables (no connectors)

- Alligator clips (temporary)
Alligator clips grab anything with strength (and good ones have a plastic cover that covers up the clip after grabbing to avoid short circuits), are good but should be considered temporary
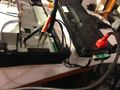
A PSU from a CECH-21xx PS3 externally wired to a CECH-30xx PS3, using an adaptor made with "alligator clips"
"Alligator clips" grabbing the original plugs ripped from a PS3 FAT motherboard
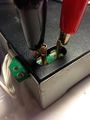
"Alligator clips" grabbing the original plugs ripped from a PS3 FAT motherboard, connected to a PS3 FAT PSU


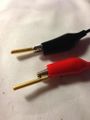
- Banana plugs (permanent for PS3 FAT)
Perfect for PS3 FAT PSU's, use 4.5 millimeter "banana plug" ones, you can attach them to a wire permanently with a pair of pliers
4,5 millimeters "banana plug" male terminals (for PS3 FAT PSU's)

"Banana plugs" connected to a PS3 FAT PSU


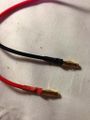
- Faston terminals (permanent for PS3 Slim and superslim)
- http://3.bp.blogspot.com/_3KnTgXGlGMY/TEArx0iJfcI/AAAAAAAAAdg/Ws0QQL9u2YY/s1600/Terminal+Faston.jpg
- http://3.bp.blogspot.com/_3KnTgXGlGMY/TEArqwrNavI/AAAAAAAAAdY/5ajtYm0072o/s1600/Terminal+Faston+1.jpg
Adapting other PSU[edit | edit source]
Convert PS3 3pin power supply to 4pin[edit | edit source]
Here is the explanation: https://www.youtube.com/watch?v=Pas1oQYaBLI
PC PSU to PS3 adaptors[edit | edit source]
Pins/Parts[edit | edit source]
CN1[edit | edit source]
AC input
CN101[edit | edit source]
PSU Control pins

CN201[edit | edit source]
PSU Control pins
CN102[edit | edit source]
12v plugs (faston plane plugs)
CN202[edit | edit source]
12v plugs (faston plane plugs)
Fuse[edit | edit source]
F101 (T8AH AC250V) Have opened a LSEB1226B1 power supply and this has a 6.3A 250V fuse just in from the external mains power feed. Elsewhere on the board is PR201, a 5A 250V part.
RY101[edit | edit source]
Relays for 12V line
Thermal Fuses[edit | edit source]
THP101, THP201
Potmeters[edit | edit source]
PFC +B ADJ (RV301)[edit | edit source]
next to relays RY101 connected to 14pin IC303 "LM339DG # PBB636"
<jordosaxman> RV301  has 3 points, 1 of them goes to the solder point, one goes to the tiny resistor above it labeled 153
<jordosaxman> the third point is buried, no trace points on the top side, must go to the bottom
<jordosaxman> yeah it looks like RV301 hits a resistor and then goes to pin 3 of IC303
OCP ADJ (RV302)[edit | edit source]
Over Current Protection Adjustment (DO NOT TOUCH THIS UNLESS YOU KNOW WHAT YOU'RE DOING)
Connected to 16pin IC305 "6j3y # cxa8038a"
Fmin ADJ (RV303)[edit | edit source]
next to 16pin IC305 "6j3y # cxa8038a"
PFC Freq ADJ (RV304)[edit | edit source]
Connected to 16pin IC301 "uc3854dw # 6bm14ew"
ICs[edit | edit source]
IC301[edit | edit source]
16pin IC301 "uc3854dw # 6bm14ew"
IC303[edit | edit source]
14pin IC303 "LM339DG # PBB636"
IC305[edit | edit source]
16pin IC305 "6j3y # cxa8038a"
PH[edit | edit source]
PH101[edit | edit source]
5vsb reg "NEC"
PH201[edit | edit source]
5VSB latch "NEC"
Travel Transformers[edit | edit source]
DO NOT use an external transformer! Use only a passive travel plug, quote from the PS3 manuals:
- Do not connect the AC power cord to a voltage transformer or inverter. Converting the AC power cord to a voltage transformer for overseas travel or use in an automobile may cause heat to build up in the system and may cause burns or a malfunction.
Sources, external links[edit | edit source]
- Generic PS3 PSU info - http://www.edepot.com/playstation3.html#PS3_Power_Supply
- Photos and info - http://www.trisaster.de/page/index.php?topic=264
- PS3 PSU behavior details - http://www.ps3hax.net/showthread.php?t=72332
- Slim PSU the real pinout - http://web.archive.org/web/20141119011200/http://www.ps3hax.net/showthread.php?t=58231
- Finalman's PS3PC case mod - http://www.ps3hax.net/showthread.php?t=56243
- XP Power supply Tech Guide - http://www.epowerco.com/Xp_Power_supply_Tech_Guide.pdf
| ||||||||||||||||||||||||||||||||||||||||||||||||||||||||||||||||||||||||||||||||||||||||||||||||||||||||||||||||||||||||||||||||||||
