Downgrading with Hardware flasher: Difference between revisions
| Line 1: | Line 1: | ||
==Reinstall firmware in Factory Service Mode== | ==Reinstall firmware in Factory Service Mode== | ||
<div style="float:right"> | <div style="float:right"> | ||
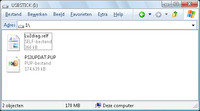
[[File:Eclipse-inserted-in-FAT-PS3-green-led-lit.png|200px|thumb|left|PSGrade/JIG - in right most USB Port - for triggering factory service mode]]<br />[[File:USBSTICK-content-for-factory-service-mode-downgrading.png|200px|thumb|left|USBSTICK - content for factory service mode - downgrading]]</div> | [[File:Eclipse-inserted-in-FAT-PS3-green-led-lit.png|200px|thumb|left|PSGrade/JIG - in right most USB Port - for triggering factory service mode]]<br />[[File:USBSTICK-content-for-factory-service-mode-downgrading.png|200px|thumb|left|USBSTICK - content for factory service mode - downgrading]]<br />[[File:Sandisk-Cruzer-4GB-nonU3-inserted-in-Fat-PS3.png|200px|thumb|left|USBSTICK - in right most USB Port - for installing in factory service mode]]</div> | ||
For this step it is required to have the console fully assembled (connected PSU, harddrive, wifi/bt board, blu-ray drive etc). | For this step it is required to have the console fully assembled (connected PSU, harddrive, wifi/bt board, blu-ray drive etc). | ||
Revision as of 16:16, 2 December 2012
Reinstall firmware in Factory Service Mode
For this step it is required to have the console fully assembled (connected PSU, harddrive, wifi/bt board, blu-ray drive etc).
- Use the PSGrade/JIG dongle to trigger Factory Service Mode
- Remove power from the console (rear power switch or remove powercord)
- Put PSGrade/JIG dongle in the right-most USB port (closest to the Blu-Ray drive)
- Power the console so it is in standby (rear power switch or attach powercord)
- Press power button on front of the PS3 then immediately press eject within ~100ms
- If powered on correctly your dongle will light up (usually green) and trigger Factory Service Mode. The PSGrade will then power off the console. If it boots into the XMB with a red FSM logo in the corner you are using an old PSGrade.
- Put the Lv2diag.self (see below) and a pre-patched firmware to install (named PS3UPDAT.PUP) in root of your USB Mass Storage Device and plug it in the PS3 (in the same port as the PSGrade).
- Turn PS3 on and it will automatically install the firmware you had put there. You will not have anything on the screen, you can only tell it is installing by the flashing USB and PS3's HDD light
- PS3 will turn itself off after finishing the firmware installation (If it flashes red the firmware did not install correctly).
A logfile should be present in root of the USB Mass Storage Device with no errors
See also Downgrading with PSgrade Dongle, which also contains alot of ready to use PSgrade HEX files for several dongles.
PUP to use
Rogero V3.7 (mirror / MD5:8f8166b25d6bed891f292c77de5c4b28)
for noFSM, use 9.99 downgrader instead: MD5:b67747f529d047d63151786544a58b50
or any firmware with prepatched lv1 (no syscon hash checks)
Note: if your end-goal is a 3.56+ MFW, then it is safer to downgrade first to 3.55. Upgrading in service mode is never recommended (only lower or same version).
Different Factory Service Mode SELFs
NAND
For factory Service Mode install:
- if using the normal lv2diag : Use a NoBD patched PUP (e.g. Rogero NoBD PUP) (to prevent error 0x8002f057)
- if using the jaicrab NoBD lv2diag : Use the Rogero normal PUP - see note below (and redump flash after FSM to check both ROS)
note: since V3 Rogero is only available as noBD, use that one with normal lv2diag.self
NOR
Use the normal lv2diag and use the Rogero normal PUP
Only when having a console with a broken bluraydrive, you either:
- use the normal lv2diag : Use a NoBD patched PUP (e.g. Rogero NoBD PUP) (to prevent error 0x8002f057)
- use the jaicrab NoBD lv2diag : Use the Rogero normal PUP - see note below
note: since V3.7 Rogero is only available as noBD, use that one with normal lv2diag.self
| Filename | Size | Remarks | SHA1 |
MD5 |
CRC32 |
CRC16
|
|---|---|---|---|---|---|---|
| Lv2diag.self (365.5 KB) | 374272 | 3.55 get in FSM * | 1ED037740D67FEBACA6449CABFF4E95400C9E2EE |
099F33A7967F99E91C07E870FD78B3DB |
9338ABF2 |
4FCC
|
| Lv2diag.self (227.38 KB) | 232832 | jaicrab noBD patched | 180823003B086D9D49BC7F83BEA9C769BF73A5EA |
3615770407C0C3FA00D8CA49C8ADB362 |
25E85CFB |
EDD0
|
* recommended default choice, see above notes
Check the logfile
After installation of the firmware, take the created logfile in root of USB Mass Storage Device and look if it contains errors (pastie the log if you want to ask for help online on IRC)
Tip: You can boot console to XMB while still in FSM, if you want to be really sure it installed fine.
Getting out of Factory Service Mode
If everything went fine without errors, you can take the console out of service mode and enjoy your downgraded console :)
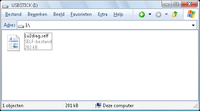
- Put the Lv2diag.self (see below) in root of your USB Mass Storage Device and plug it in the PS3 (again, in the rightmost USB port).
- Turn PS3 on, it will trigger Factory Service Mode off and shutdown.
| Filename | Size | Remarks | SHA1 |
MD5 |
CRC32 |
CRC16
|
|---|---|---|---|---|---|---|
| Lv2diag.self (201.42 KB) | 206256 | get out FSM | 329877CBD47B994EC0AFCEA6AF98114FD9E5128B |
7A20BFDAE65EEFB47A4425DB1B52DCDE |
72740080 |
502A
|


