Teensy++ 2.0: Difference between revisions
| Line 3: | Line 3: | ||
* [http://git.dashhacks.com/norway NORway] (not working link, need working mirror) | * [http://git.dashhacks.com/norway NORway] (not working link, need working mirror) | ||
* [http://www.mediafire.com/?ir89sxupwspp3j4 NORway_v0.1] | * [http://www.mediafire.com/?ir89sxupwspp3j4 NORway_v0.1] | ||
* [http://www.multiupload.com/HZKWCNSQAK NORway_v0.2.zip] | |||
* [http://www.multiupload.com/0XA2QXORA0 NORway_v0.3-master.tar.gz] | * [http://www.multiupload.com/0XA2QXORA0 NORway_v0.3-master.tar.gz] | ||
* [http://www.multiupload.com/DHKAZT1KXV NORway_04beta10.zip] | * [http://www.multiupload.com/DHKAZT1KXV NORway_04beta10.zip] | ||
Revision as of 13:31, 21 December 2011
Teensy 2.0 ++ Information
- NORway (not working link, need working mirror)
- NORway_v0.1
- NORway_v0.2.zip
- NORway_v0.3-master.tar.gz
- NORway_04beta10.zip
Hardware Picture
To be added...
Hardware Installations (Case Modifications by CECH Model)
First open the PS3. Follow youtube videos to learn how (Just search).
Once opened, look at the motherboard model printed there. Depending on which model you have follow the case modifications below to install teensy.
There are two methods to use a Teensy 2.0++ Flasher.
1.) Install while the PS3 is somewhat opened still with everything plugged in. (Be careful of shorts.)
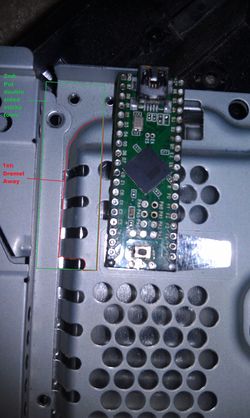
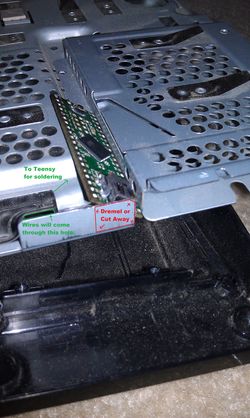
2.) Internal Case Modifications. This is the best way to go as you can install the teensy inside of the PS3 for later use. This is the advantage of using a Teensy 2.0++ because it's just small enough to install inside the PS3 with a little case modification. Other flashers are generally too large to do this with the PS3 closed up. You will find there is just no room for it.
DYN-001
This model requires the following:
1x Sony Playstation 3 Console
1x Teensy 2.0 ++
1x Dremel Tool
1x Drill
1x Roll of Double Sided Foam Tape
1x 30AWG Kynar Wire or 26 AWG Kynar Wire. (Few have reported 30AWG may be too small and has interference but does work if done well.)
1x Torque 8 Screwdriver
1x Regular Phillips Head Screwdriver
1x Solder (Can be leaded or no-lead)
1x Soldering Iron (Radioshack 15-30 Watt Will Work.)
1x Bottle Of Flux No-Clean
1x Bottle Of 99% Isoprobyl Alcohol
1x Box of Q-Tips (For spreading flux and alcohol where needed.)
1x Pair Of Steady Hands (Not Joking. Tremor Fingers will not cut it. You are soldering 40+ points and all must be done very well.)
1x Good Lighting (Either very well lighted room, or a Lamp. You need to be able to check your work.)
1x Magnifying Glass (To check your soldering joints.)
1x Patience.
As you can see it requires a lot of materials to perform this kind of job. If you do not already have the parts for this kind of project, it will probably be cheaper to pay someone else to do it and ship it to and from them. Also if you are not confident in your soldering technique, it is a very realistic possibility that you will ruin your Playstation 3 Console during this process as there are a LOT of soldering joints that need to be perfectly made.
JSD-001
This model requires the following:
1x Sony Playstation 3 Console
1x Teensy 2.0 ++
1x Drill
1x Roll of Double Sided Foam Tape
1x 30AWG Kynar Wire or 26 AWG Kynar Wire. (Few have reported 30AWG may be too small and has interference but does work if done well.)
1x Torque 8 Screwdriver
1x Regular Phillips Head Screwdriver
1x Solder (Can be leaded or no-lead)
1x Soldering Iron (Radioshack 15-30 Watt Will Work.)
1x Bottle Of Flux No-Clean
1x Bottle Of 99% Isoprobyl Alcohol
1x Box of Q-Tips (For spreading flux and alcohol where needed.)
1x Pair Of Steady Hands (Not Joking. Tremor Fingers will not cut it. You are soldering 40+ points and all must be done very well.)
1x Good Lighting (Either very well lighted room, or a Lamp. You need to be able to check your work.)
1x Magnifying Glass (To check your soldering joints.)
1x Patience.
As you can see it requires a lot of materials to perform this kind of job. If you do not already have the parts for this kind of project, it will probably be cheaper to pay someone else to do it and ship it to and from them. Also if you are not confident in your soldering technique, it is a very realistic possibility that you will ruin your Playstation 3 Console during this process as there are a LOT of soldering joints that need to be perfectly made.
- Pictures to be added later...

