JAISPI: Difference between revisions
mNo edit summary |
|||
| Line 161: | Line 161: | ||
PS4 NOR Chip Dumping Process Documentation | PS4 NOR Chip Dumping Process Documentation | ||
* [https://www.mediafire.com/?6jcpwd7mzw6fnsk as PDF] | |||
https://www.mediafire.com/?6jcpwd7mzw6fnsk | * [http://playstationhax.it/forums/topic/1749-ps4-nor-chip-dumping-process-documentation/ as forumtopic] | ||
{{Hardware Modification}} | {{Hardware Modification}} | ||
<noinclude>[[Category:Main]]</noinclude> | <noinclude>[[Category:Main]]</noinclude> | ||
Revision as of 12:39, 21 April 2015
| This article is marked for rewrite/restructuring in proper wiki format. You can help PS4 Developer wiki by editing it. |
Someone should crosscheck the spanish and realworld into english for wiki here, please.
JAISPI
JAISPI - Raspberry Pi SPI flasher for PS4
Source:
JAISPI - Utility to read and write to the main memory (MX25L25635FMI-10G) of PS4 with the Raspberry Pi through the SPI protocol.
Changelog
- v1.0
- Support MX25L25635FMI-10G
- Reading
- Programming
- Full Erase
Installation Instructions
Materials Required
- 1x Raspberry Pi (see talkpage for where to buy)
- 1x SD Memory (for Raspbian, a 4GB minimal is recommended)
- 1x PS4 Serial Flash MX25L25635FMI-10G desoldered from console
Downloads
- Raspbian (http://downloads.raspberrypi.org/raspbian_latest)
- Win32 Disk Imager (http://sourceforge.net/projects/win32diskimager/files/latest/download)
- Putty (http://the.earth.li/~sgtatham/putty/latest/x86/putty.exe)
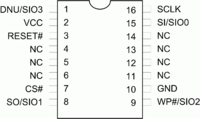
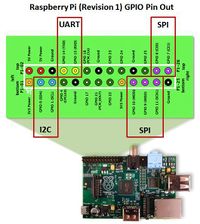
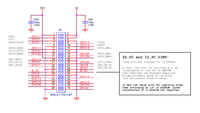
Pinout
| 8-Pin | 16-pin | Usage | Raspberry Pi JAISPI |
Description |
|---|---|---|---|---|
| - | 1 | SIO3 | NC | 8pin: Not Available - not used / 16pin: Serial Data Input & Output (for 4xI/O read mode) |
| 8 | 2 | VCC | 17 | +3V DC Power Supply |
| 7 | 3 | HOLD#/RESET# | NC | 8pin: Hold, to pause the device without deselecting the device / 16pin: Hardware Reset Pin Active low |
| - | 4 | NC | NC | No Connection |
| - | 5 | NC | NC | No Connection |
| - | 6 | NC | NC | No Connection |
| 1 | 7 | CS# | 24 | Chip Select |
| 2 | 8 | SO/SIO1 | 21 | Serial Data Output (for 1 x I/O) or Serial Data Input & Output (for 2x I/O or 4x I/O read mode) |
| 3 | 9 | WP#/SIO2 | 25 | Write Protection: connect to GND or Serial Data Input & Output (for 4x I/O read mode) |
| 4 | 10 | GND | 25 | Ground |
| - | 11 | NC | NC | No Connection |
| - | 12 | NC | NC | No Connection |
| - | 13 | NC | NC | No Connection |
| - | 14 | NC | NC | No Connection |
| 5 | 15 | SI/SIO0 | 19 | Serial Data Input (for 1 x I/O) or Serial Data Input & Output (for 2x I/O or 4x I/O read mode) |
| 6 | 16 | SCLK | 23 | Clock Input |
Use short wires, esp. if you are not adding the 0.1µF capacitor between ground and vcc as close as possible to the chip
newer Raspberry Pi model B+ and Raspberry Pi model A+ both use same pinout for the first 26 pinheaders as the previous nonplus model, so it should work on that as well.
Installation
Installing Raspbian
Run win32diskimage (if you use linux you can use dd)
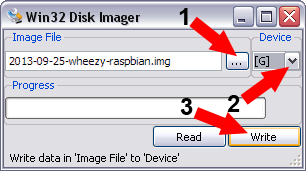
- In "Image file" select the downloaded and decompressed Raspbian image (2013-09-25-wheezy-raspbian.img at the time of this writing)
- In "Device" select the drive where the SD memory is.
- Select "Write".
After finished writing, put the SD card in the Raspberry Pi and power it up by inserting the USB cable.
Remote Shell into Raspbian
Two minutes after booting up the Raspberry Pi, run Putty.
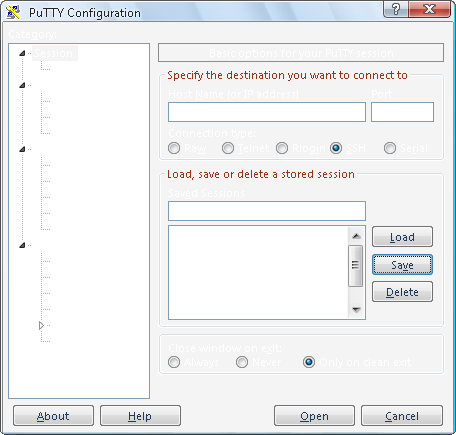
- In Host Name put: raspberrypi
If this doesn't works properly, go to the router, find the IP assigned to your Raspberry Pi and use that instead, - Select SSH
- Select Open
Installing Application
It will request a Login. According Raspbian the user is "pi" and the password "raspberry" (Both without quotes).
Insert the following commands:
sudo -s
cd /bin
wget http://jaicrab.org/Ps4/Tools/JAISPI/jaispi
chmod +x jaispi
echo "#blacklist spi-bcm2708" > /etc/modprobe.d/raspi-blacklist.conf
echo "blacklist i2c-bcm2708" >> /etc/modprobe.d/raspi-blacklist.conf
reboot
Installation is complete. By Putty you can access the Raspberry Pi. To run the command jaispi you need to be root (sudo-s):
Options
 -i /dev/spidevX.X             Get ID from flash
 -r file.bin /dev/spidevX.X    Read entire flash to file
 -e /dev/spidevX.X             Erase entire flash
 -p file.bin /dev/spidevX.X    Only write blocks differences from file
 -v file.bin /dev/spidevX.X    Verify blocks with file
Get ID
-i: Displays information of the flash.
#jaispi -i /dev/spidev0.0
JaiSpi v1.0
ID:  0xC22019 MX25L25635
Read
-r: Makes a full dump of the flash (Average time: 35sec)
#jaispi -r DUMP.bin /dev/spidev0.0
JaiSpi v1.0
ID:  0xC22019 MX25L25635
Reading...
0x02000000
Done!
Erase
-e: Clears all flash (Average time: 1min, 30sec)
#jaispi -e /dev/spidev0.0
JaiSpi v1.0
ID:  0xC22019 MX25L25635
Erasing blocks...
Done!
Program
-p: Write to flash only the changed sectors (Average time: 1min 30sec)
#jaispi -p Base.bin /dev/spidev0.0
JaiSpi v1.0
ID:  0xC22019 MX25L25635
Starting...
0x02000000 -> 8192 Sectors written
Done!
Verify
-v: Compares the flash contents with a file in PC (Average time: 35sec)
#jaispi -v Base.bin /dev/spidev0.0
JaiSpi v1.0
ID:  0xC22019 MX25L25635
Checking...
0x02000000 -> 0 Different sectors
Done!
JAISPI / PS4 NOR Chip Dumping personal experience by AlphaHacks
PS4 NOR Chip Dumping Process Documentation
| |||||||||||||||||||||||||||||||


